

History of this rose is easier to build than the one of its author. There is very few about this japanese mathematician, who teachs in the Sasebo Technologycal School and became the first "Doctor in Origami" of History. He is also known for his theoretical studies about the relationship between origami and mathematics, developing, among others, the Theory of Iso-Areas (Mirror Areas). In 1998 he pulished Roses, Origami & Math (which should be now on its way to my home :) )
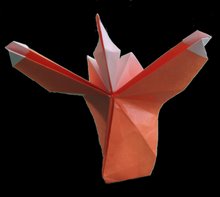
 On this book there is a complete chapter dedicated to this rose and its variations, being this the first version "from the author" of its diagram. Before, in 1994, during the New York Convention, Kawasaki teached the rose to the american creator Joseph Wu and he folded and gifted one to his friend Winson Chan. He unfolded the gift and developed a folding sequence and diagram, which was published and spread trough the net, becoming very popular and known as the "New Kawasaky Rose". Later, japanese Kunihiko Kasahara published in his book "Origami for the Connoisseur" a diagram a little less elaborated than Chan's and called it the "Original Kawasakai Rose". Many other variations has been created over this three diagrams, to get a larger number of petals or diferents finishing details, but the heart of this figure, the twisting fold, remains unvariable as a testimony of the geniality of its author.
Chan's diagram remains being my favourite, mostly because its final result and also I guess because sentimental reasons (it was one of the first figures I've memorized and gifted) However, I have to admit that its 22.5º grid pre-folded takes out all ellegance to the next steps in the folding. Here there is a video about how the rose is collapsed from its pre-folded CP.
 Is when I remember my old Maths teacher at school, saying by memory: "there is one and just one perpendicular line to a given line which passes through a given point". That can be read as an Origami Theorem: "To fold a perpendicular line of a given one is necessary only that line and a given point"
Same thing occurs with the other folds from that step:


My hope was to get the rose whit the less possible number of foldings, to get the petals as much clean as possible, but at the end, just a few of them can be avoided. Also the sequence itself is as complicated as Chan's (or even more). All I could keep was the great experience of having learned a lot and grown-up in my relationship with folding and geometry, both things which justify the experience and that's why I share it to anyone who desires to try it. This is the link to the document Google Base page and thi is the direct link to the document (it is zip pdf file and its size is about 1 Mb):
newrose2.pdf.zip
Many regards and luck if you try it :), I'll be happy to answer any question about it.


9 comments:
The Link to the zip-file with the pdf-file inside doesn´t work :(
hi timo,
maybe you are trying to right clicking the link and "saving target as..." It is a Google Base page and there it is a link to the file. The direct link to the file is:
http://base.google.com/base_media?q=hand-4067043556441292646&size=8
I will put this link in the post, thanks for the advice.
Try it and if it doesn't work I'll find a way to put in a different server.
regards.
Thanks, I was able to open it now :-)
keep up the good work
=)
i like the slide show
Hi Timo, Steyen
hope to see your rose some day Timo.
thank you very much Steyen for your words, I just want to be of some use. Though I'm only an amateur yet :)
I will add some other models to the slide.
Hello Peter,
I just learned to fold the new Kawasaki Rose and it took me at least 2 hours to fold one rose using Chan's method. You have done a great job on reducing the numbers of fold required to do the same rose. I am trying to learn your method. From the instruction, I do not understand step 6, 7, 8 on how to mark the points to get D, E, F lines show on step 10. What is mean by mark the point, i intrepret it as drawing a dot there, but the dots i draw tend to appear on a different place. Appreciate you can explain some on this. Keep up the good work. Thank you.
Hi chin
many thanks for your interest on it! I know the diagram is not very clear, I'm working in a new version with pictures which I hope to upload in this week or the next one.
But I'll try to explain a little more this steps you're mentioning. When I say "mark just the point E" (or F) I'm trying to avoid to fold that line for all the layers that are together, because on step 6 you are folding the complete model, a group of layers, and when you unfold everything on step 10 you will have two angles drawed, the one for the petal and a mirror one from point D, you can do so anyway, but I suggest just to "pinch" point E, meaning to fold just the area when point E is going to be, so you get just two mirrored points referent to D, one to the right (the desired one) and another in the left), then in step 11 you propper mark the line DE.
To fold just the point you can make the DE fold on E area and a perpendicular one along the border where lies E on step 6 (same thing with F), then you have a cross, but trying to make it as small as possible.
I hope I was a little more clear. I promisse the new diagram :)
here for further questions and thanks again for your words.
May I share your diagram...
Thanks..
Hi Linda
of course, take a look on my youtube channel, there is some videos on this rose
let's keep in touch
Post a Comment